

Only key users can create and manage triggers. Triggers always apply to the whole firm.
Create a trigger
1
Name and describe the trigger
Click Triggers in the main rail, and click Create. Enter a Title and a Description, and click Confirm.The title appears everywhere the trigger does, including on the alert in an administration. Use the description to explain what the trigger looks for, and why, so your colleagues understand the alert. Use the nl, en and fr buttons to enter the title and description in each language.
2
Set the base filter
On the Trigger configuration tab, optionally limit the trigger to the administrations it’s relevant for. See Base filter.
3
Set the trigger criteria
Add at least one criterion that decides when the trigger fires. See Trigger criteria.
4
Choose the table columns
Optionally, choose which KPIs the trigger’s table shows. See Table columns.
5
Save and sync
Click Save. Then click the three dots at the top right, and choose Sync. aiGust checks all administrations and creates the alerts.
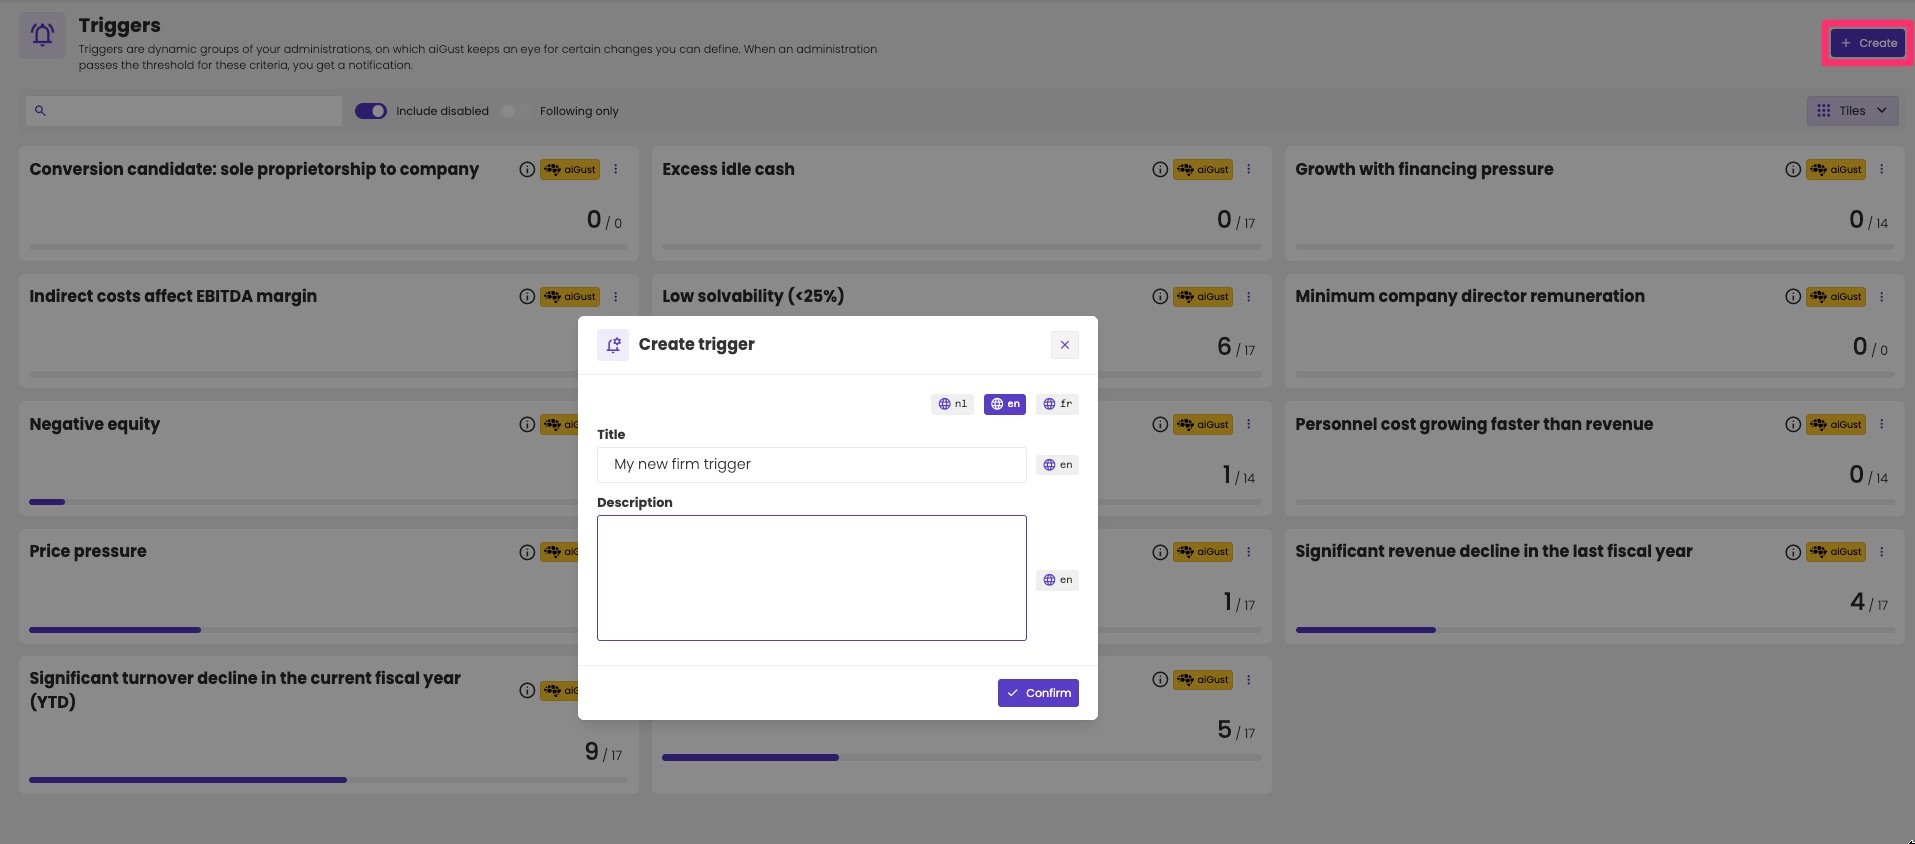
Create a trigger with a title and description in each language.
The trigger configuration
The Trigger configuration tab has two sections: Base filter and Trigger criteria. You build both in the same way as the filters of a peer group. Click Add a filter to add a criterion, the pencil to change it, and the bin to remove it. Each section shows Valid when its filters are complete. Use Reuse filter group to start from a query saved in advanced search. Advanced search uses the same filters, and anyone at your firm can build and save queries there. That way, a colleague’s saved query can become a trigger. At the top right:- Table configuration opens the table columns. See Table columns.
- Reset goes back to the last saved version of the trigger.
- Save saves the trigger.
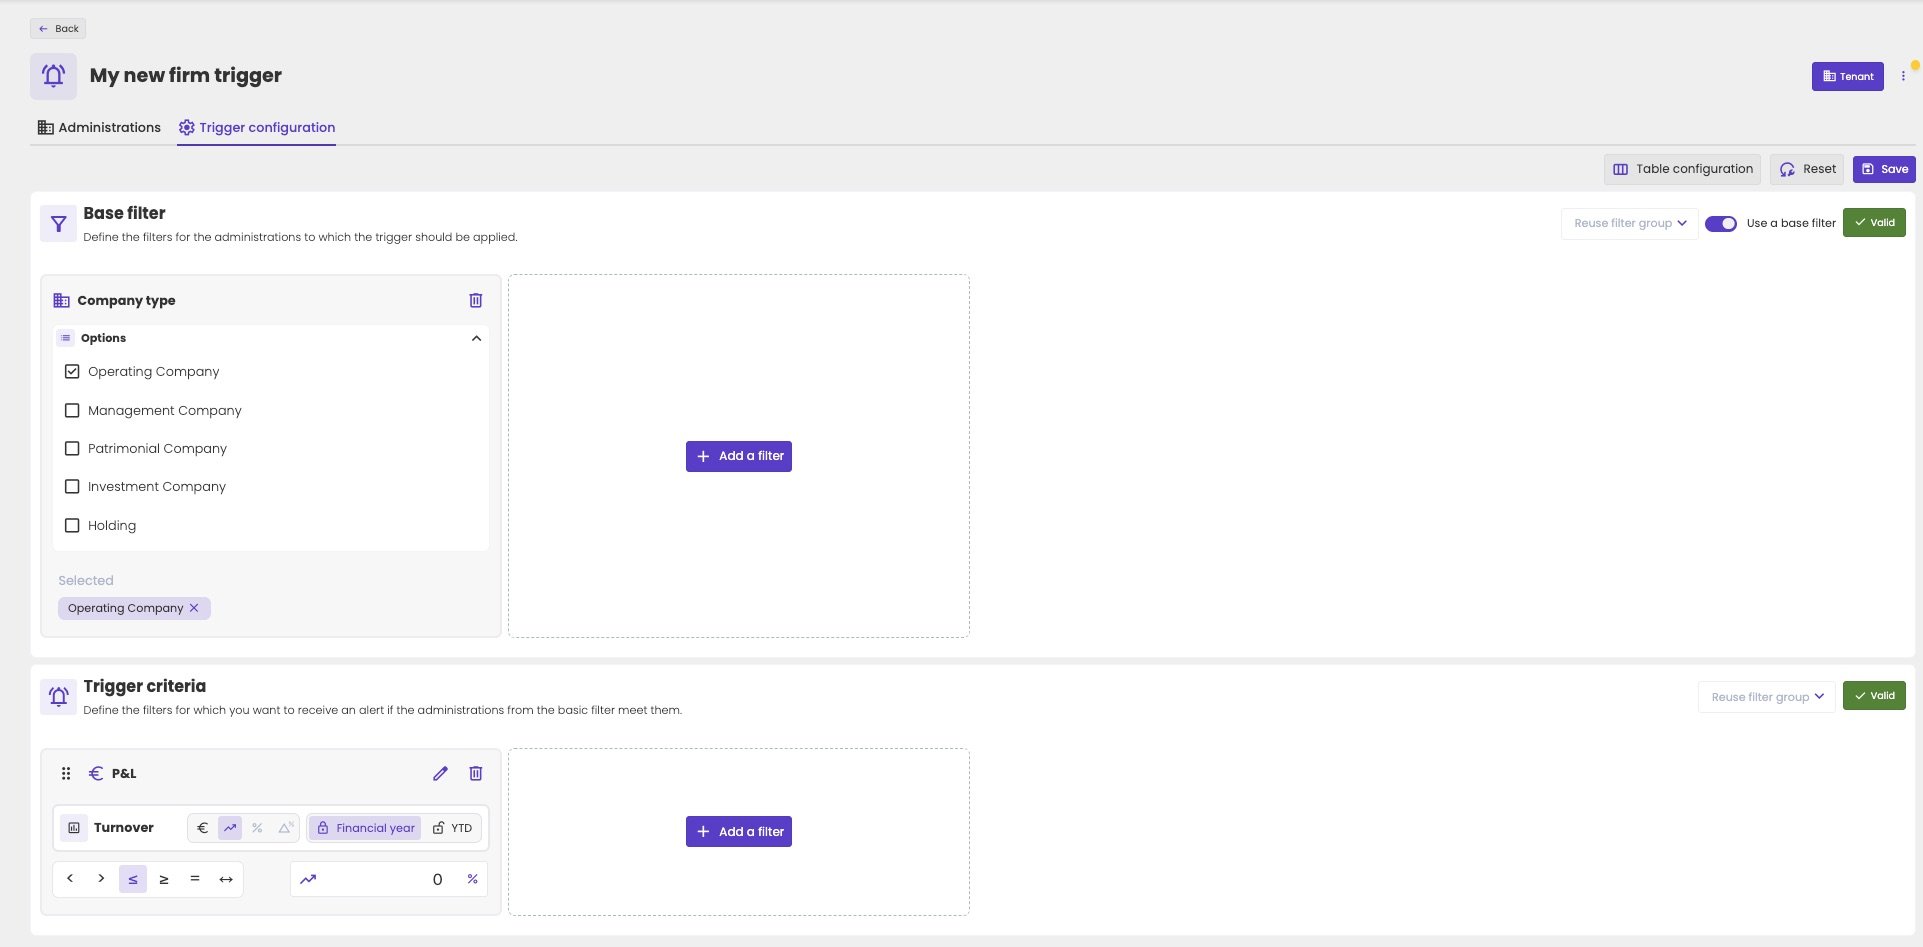
A trigger for operating companies whose turnover didn't grow.
Base filter
The base filter limits the trigger to the administrations it’s relevant for, without selecting them one by one. It’s optional: turn off Use a base filter, and the trigger applies to all administrations of your firm. Examples:- A minimum turnover, for example €25,000, to leave out dormant companies and companies winding down.
- Company type: a trigger about margins or pricing makes sense for operating companies, not for management companies.
- Legal type, for example only BV and NV.
Trigger criteria
The trigger criteria decide when the trigger fires. You need at least one criterion. When you add a KPI, a wizard guides you:- Choose the report or KPI group: profit and loss, balance sheet, cash flow, financial ratios, or personnel figures and ratios.
- Drill down to the line, for example from the profit and loss to indirect costs to personnel.
- Choose the KPI type with the icons next to the KPI.
- Choose Financial year or YTD.
- Choose the operator: less than (<), greater than (>), at most (≤), at least (≥), equal to (=), or between (↔).
- Enter the value, for example −10 for a horizontal delta of −10%.
Table columns
The Administrations tab of a trigger shows a table of the administrations it applies to. By default, the table shows the KPIs used in the filters. To change the columns, click Table configuration on the Trigger configuration tab. In the Column configurator, you can:- Add a KPI with Add, in the same way as a criterion: choose the report, drill down to the line, and choose the KPI type and Financial year or YTD.
- Change the order by dragging the handle to the left of a KPI.
- Remove all KPIs with Delete all. The three dots next to a KPI hold more options.
- Reset the columns to the last saved version.
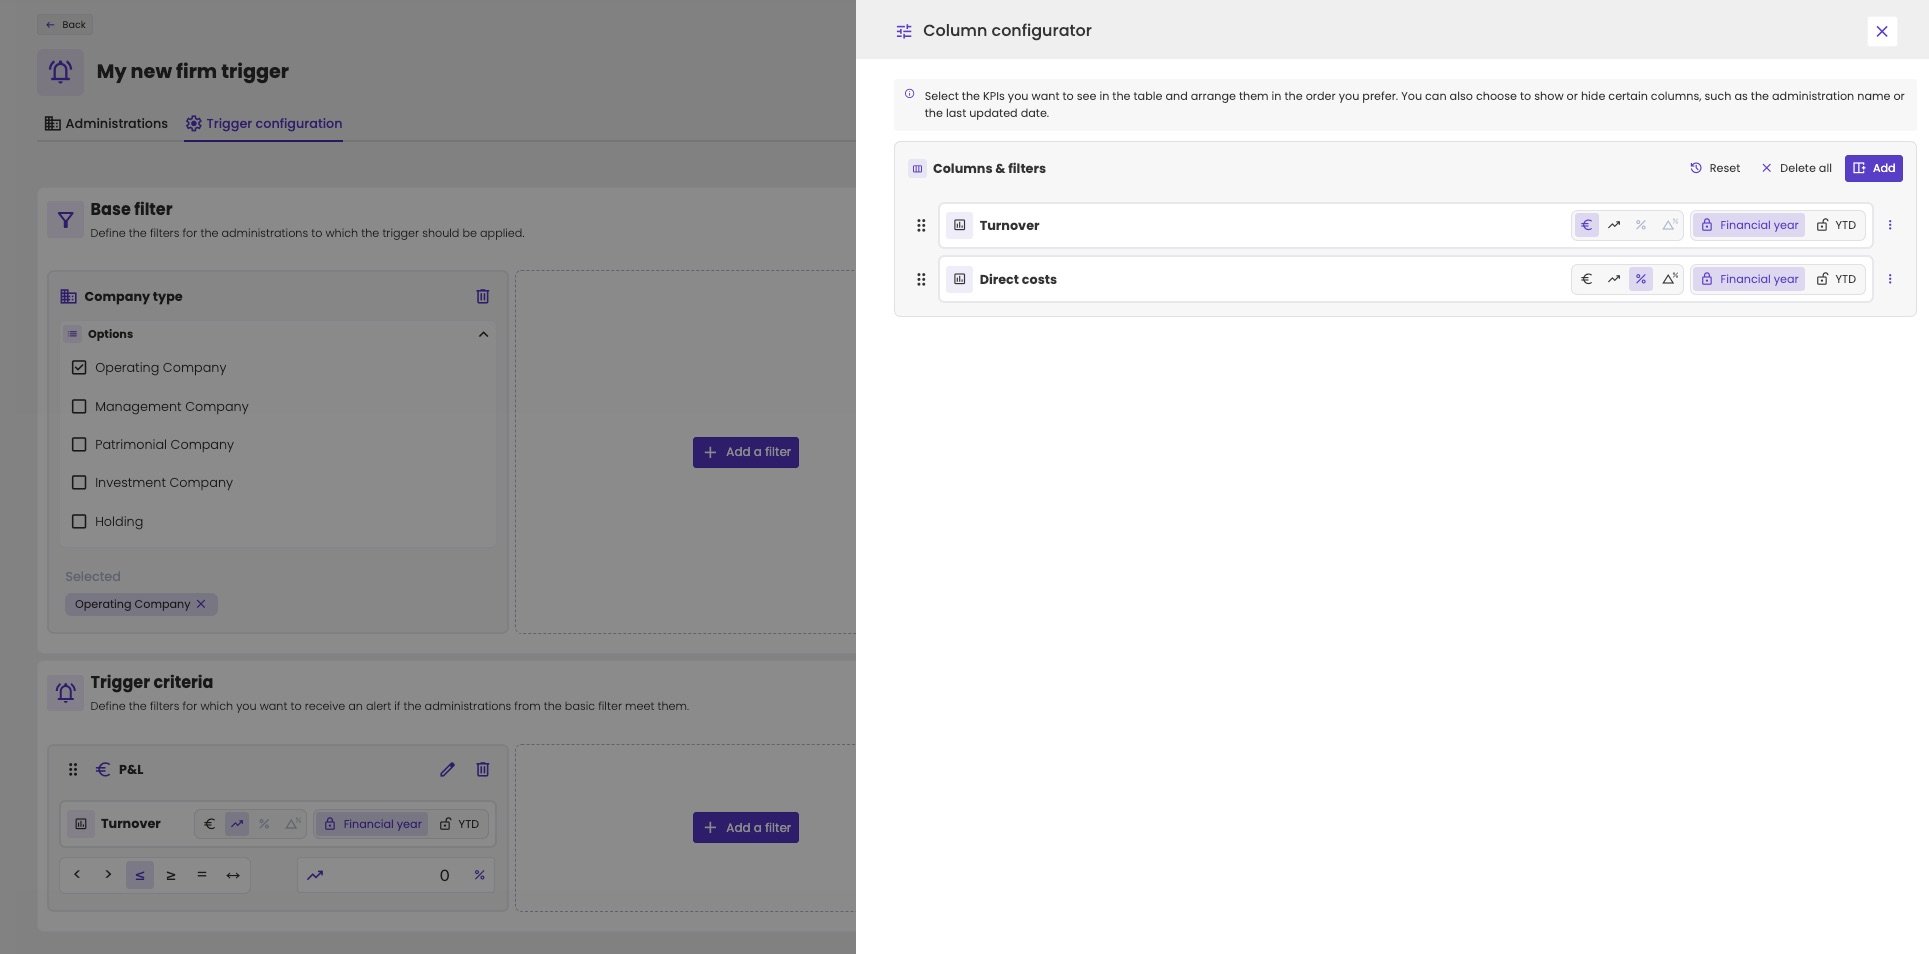
The Column configurator, with Turnover as an amount and Direct costs as a percentage.
Sync a trigger
aiGust checks every trigger automatically every 24 hours. Alerts appear when administrations start to meet the trigger, and disappear when they no longer do. To check a trigger right away, for example after changing its filters, click the three dots at the top right of the trigger, and choose Sync.Rename, disable or delete a trigger
Click the three dots on the trigger’s tile in the overview, or at the top right when the trigger is open:- Rename changes the title and description.
- Disable switches the trigger off for the whole firm. It no longer raises alerts, but you can enable it again later. Turn on Include disabled in the overview to see disabled triggers.
- Delete trigger removes the trigger and its alerts for everyone at your firm.

The menu of a custom trigger.