AdminPulse is a cloud platform for CRM and task management, used by many accounting firms. With the AdminPulse connector, you sync the users of your firm from AdminPulse to aiGust. You don’t have to add them in aiGust one by one, and each user gets the aiGust role that matches their role in AdminPulse.
This is a first version of the integration. It only syncs users: no administrations, figures or tasks.
The sync isn’t automatic. You run it yourself when you need it, for example when new colleagues joined your firm.

Add the connector

You connect AdminPulse with an API key.
  1. In AdminPulse, create an API key. See Create the API key in AdminPulse.
  2. In aiGust, click Settings in the main rail, choose Connectors, and click Add.
  3. Choose AdminPulse, and click Next.
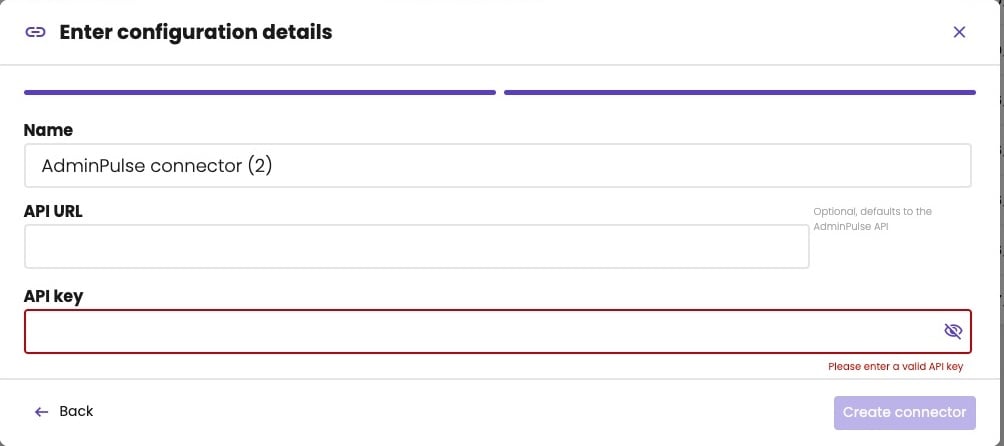
  4. Give the connector a Name, and paste the key in API key. Leave API URL empty: aiGust then uses the AdminPulse API.
  5. Click Create connector.
Enter configuration details dialog for an AdminPulse connector, with the Name AdminPulse connector (2), an empty API URL field marked Optional, defaults to the AdminPulse API, and an empty API key field with the message Please enter a valid API key. Buttons Back and Create connector.

AdminPulse needs a name and an API key.

Create the API key in AdminPulse

  1. In AdminPulse, go to My profile › API keys.
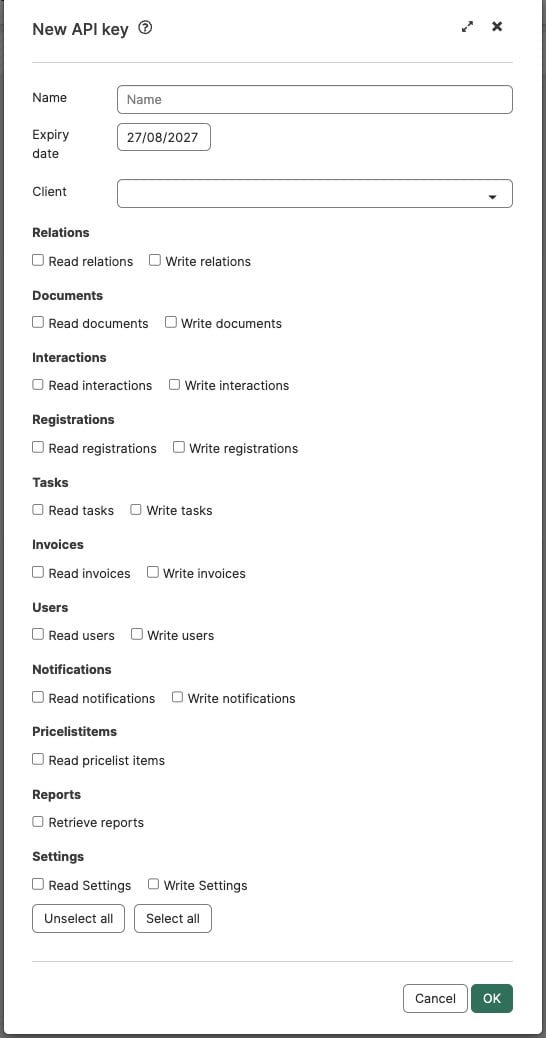
  2. Create a new API key, and give it a clear Name, such as aiGust. It tells you later what the key is for.
  3. Choose an Expiry date that matches how long you want to use the integration. When the key expires, the connector stops working until you enter a new key under Settings.
  4. Under Client, choose Own office integration. aiGust isn’t in the list yet.
  5. Give the key only the permissions aiGust needs: Read relations and Read users.
  6. Click OK, and copy the key.
New API key dialog in AdminPulse with the fields Name, Expiry date 27/08/2027 and Client, and check boxes to read and write Relations, Documents, Interactions, Registrations, Tasks, Invoices, Users, Notifications and Settings, Read pricelist items and Retrieve reports, all unchecked. Buttons Unselect all, Select all, Cancel and OK.

A new API key in AdminPulse.

For more about API keys, see Connect AdminPulse to other software in the AdminPulse help.

Manage the connector

To manage the connector, open it: click Settings in the main rail, choose Connectors, and click the AdminPulse connector. It has the tabs Settings, Health, External users, Role mapping and Synchronisation. Settings and Health work as for every connector. See Check a connector.

Map the roles

On Role mapping, choose for each AdminPulse role which aiGust role its users get: Office key user or Standard office user. Choose Do not sync to leave the users with that role out of aiGust, for example users who only register their time. See Roles.
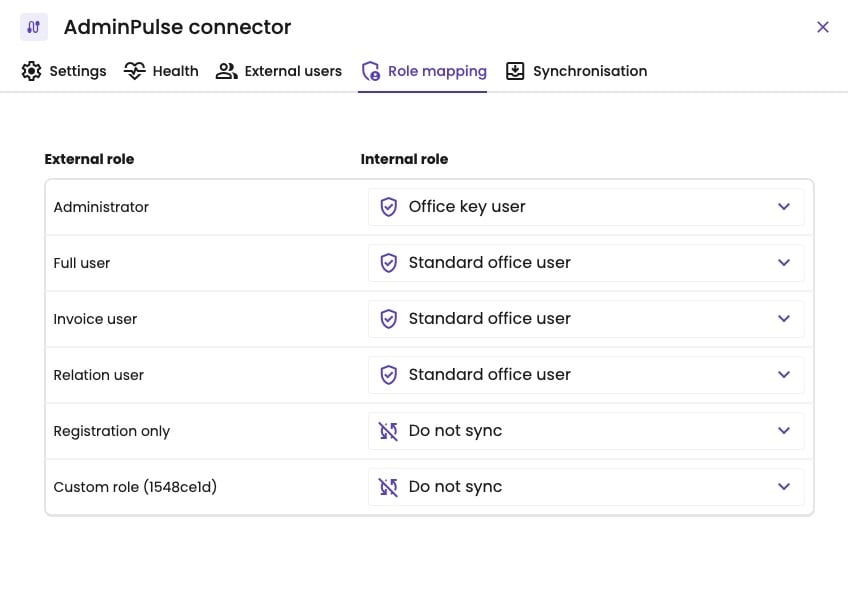
Role mapping tab of the AdminPulse connector. External role Administrator maps to Office key user; Full user, Invoice user and Relation user map to Standard office user; Registration only and Custom role (1548ce1d) map to Do not sync.

Each AdminPulse role, and the aiGust role its users get.

Your changes aren’t saved automatically. Save the role mapping after you change it.

Check the users

External users lists the users aiGust found in AdminPulse, with their role in AdminPulse (External role) and the role they get in aiGust (Internal role). Users with Do not sync stay out of aiGust.
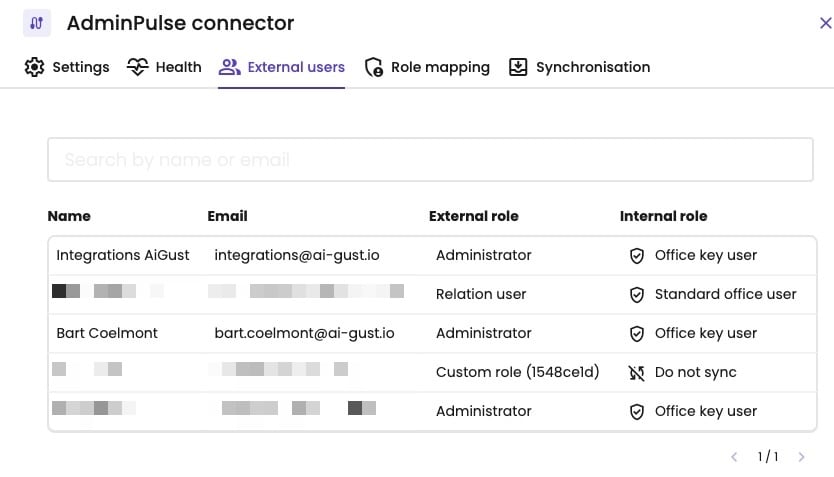
External users tab of the AdminPulse connector with a search field, and five users with their name, email, external role and internal role. Administrators become Office key user, a Relation user becomes Standard office user, and a user with a custom role is marked Do not sync. All names and emails except two are blurred.

The users in AdminPulse, and their role in aiGust.

Sync the users

  1. Open the Synchronisation tab.
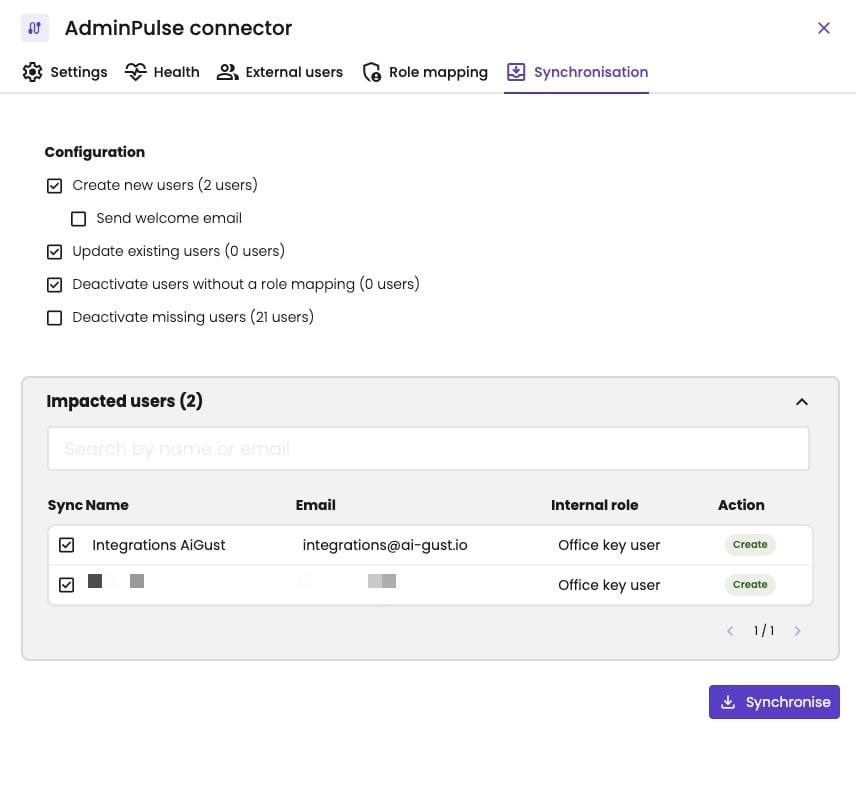
  2. Under Configuration, choose what the sync does. Each option shows how many users it affects.
  3. Under Impacted users, check the users and what happens to each of them. Clear Sync for a user to skip them this time.
  4. Click Synchronise.
Deactivate missing users also deactivates the users you added in aiGust yourself, if they’re not in AdminPulse. Check the list under Impacted users before you click Synchronise.
Synchronisation tab of the AdminPulse connector. Configuration: Create new users (2 users) checked, Send welcome email unchecked, Update existing users (0 users) checked, Deactivate users without a role mapping (0 users) checked, Deactivate missing users (21 users) unchecked. Impacted users (2): two users with the internal role Office key user and the action Create, each with the Sync box checked, one of them blurred. A Synchronise button.

Two new users to create, without a welcome email.

After the sync, the users appear under Access › Internal users. New users get access to all administrations. To limit what a user sees, see Restrict administration access.